Get to Know the Helix Interface
Once your workspace is connected, spend a few minutes learning the main interface. You don't need to memorize every detail; just know where to switch sessions, send messages, open tools, and change models.
What You'll See
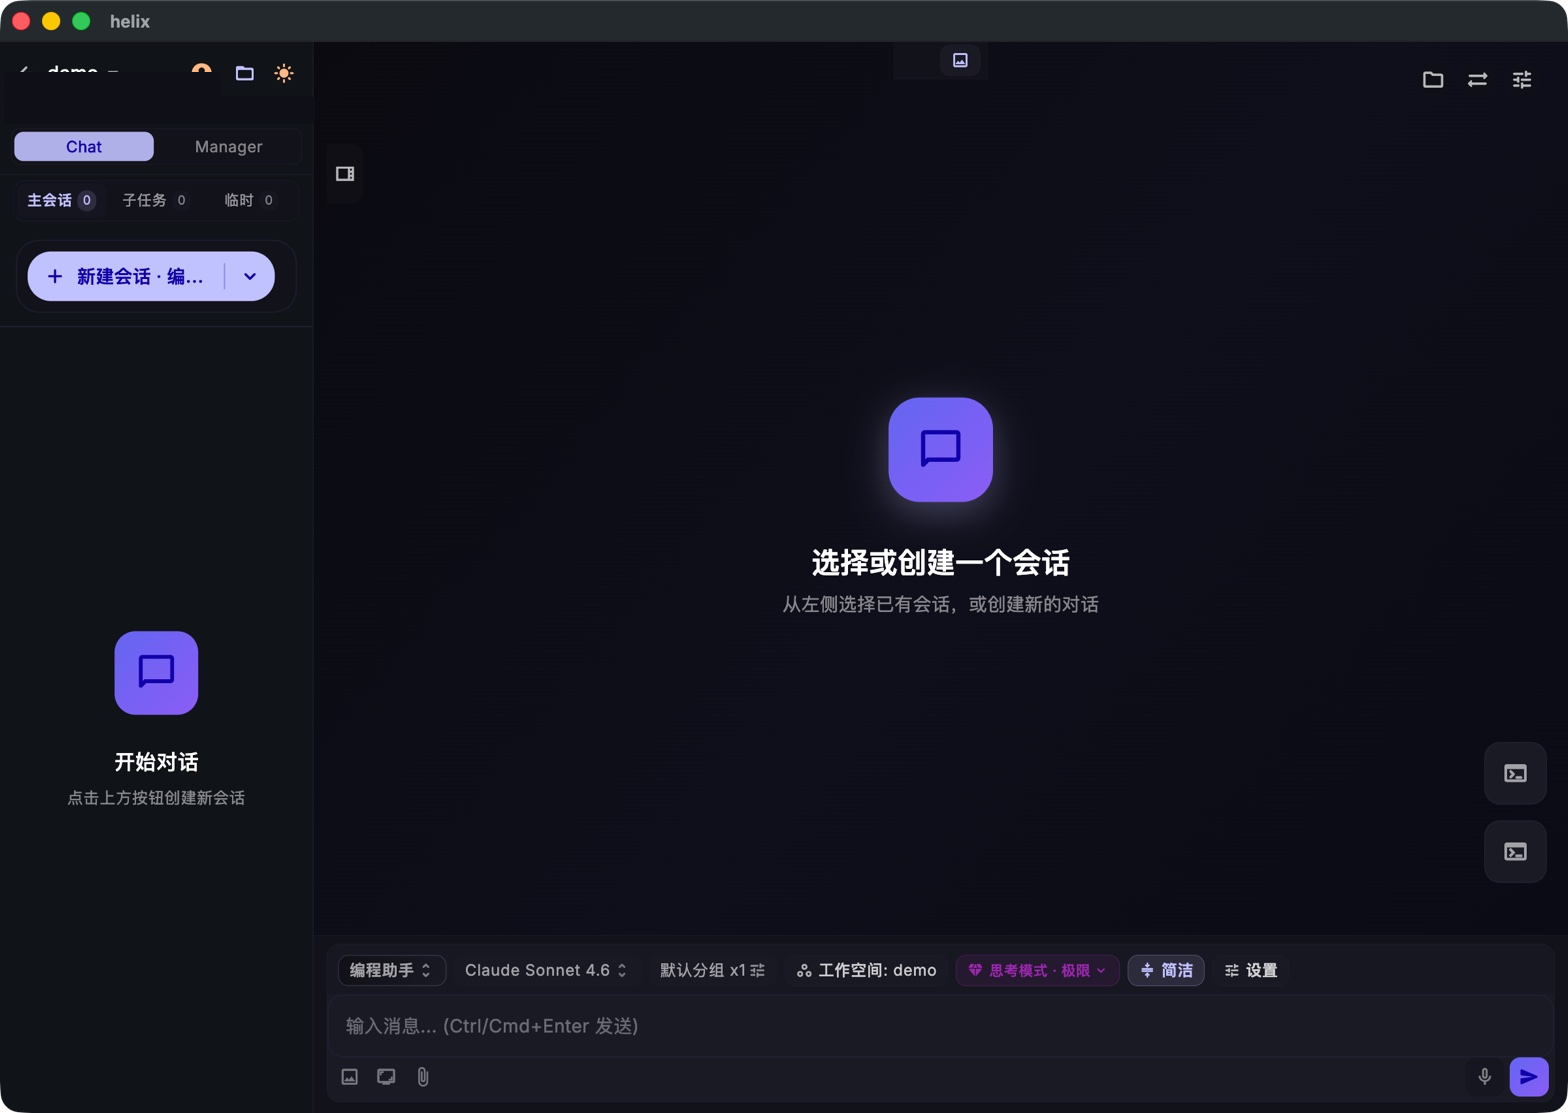 The Helix desktop interface
Read the screen from left to right and top to bottom: the left side manages workspaces and sessions, the center hosts the conversation, the top-right opens tools, and the bottom handles input and model settings.
Interface Breakdown
🔝 Top Navigation Bar
- Top left: current workspace name, with a back button for switching workspaces
- Top right: user avatar, desktop / mobile layout toggle, and light / dark theme switch
📂 Workspace Info
Below the workspace name, Helix shows the project source, directory, and device type. Treat this as the boundary of what the AI can operate on: future reads, commands, and edits happen inside this workspace.
🔀 Chat / Manager Mode Switch
Chat and Manager are the two core ways to work in Helix:
- Chat: best for everyday Q&A, single-step edits, and code explanations
- Manager: best for complex work that should be decomposed into parallel sub-tasks
When you're just starting, stay in Chat mode.
📊 Session Counters
Below the tabs, Helix shows session counts for the current workspace:
- Main sessions: normal conversations or Manager parent tasks
- Sub-tasks: child tasks spawned by Manager
- Temporary: one-off or temporary-context sessions
➕ New Session Button
+ New Session starts a fresh conversation. After clicking it, the main area opens the new session and the bottom input waits for your first message.
💬 Main Content Area
This is the conversation stream. With no active session selected, you'll see an empty state such as "Select or create a session." Once you start chatting, this area shows user messages, AI responses, and tool call cards.
🛠️ Top-Right Tool Buttons
The three most common tool entries are in the top-right corner:
- File browser: open the project tree and preview code
- Terminal: open the built-in terminal for the current workspace
- Settings: configure models, MCP tools, Skills, and appearance
📋 Bottom Toolbar
The bottom toolbar shows key settings for the current conversation and lets you change them directly:
| Item | Description |
|---|---|
| Coding Assistant | Active prompt template |
| Claude Sonnet 4.6 | Current AI model |
| Default Group x1 | Session group and concurrency settings |
| Workspace: demo | Current workspace |
| Thinking: Max | Model reasoning depth |
| Concise | Output style preference |
| Settings | Open settings |
Model, thinking mode, output style, and related items can be clicked. If a model is unavailable, you want a faster one, or you need more detailed answers, start here.
⌨️ Message Input
The message input sits at the bottom with the hint "Type a message... (Ctrl/Cmd+Enter to send)."
- Left-side buttons: screenshot, screen recording, and attachments for visual or file context
- Right-side buttons: voice input and send
Three Concepts to Remember
Workspace
A workspace is the current project boundary. Helix reads files, runs commands, and saves changes inside this directory. You can create multiple workspaces and switch between projects.
Session
A session is an independent conversation history. Different sessions can handle different tasks without interfering with each other. Within one session, the AI keeps context and understands follow-up questions.
Model Selector
The model name in the bottom bar is the AI model currently used by the session. After configuring multiple providers, you can switch models at any time; new messages use the newly selected model while history stays in place.
What You Should Be Able to Find
After this tutorial, you should be able to locate:
- New session entry
- Chat / Manager switch
- File browser, terminal, and settings entries
- Model and thinking-mode controls
- Message input and send shortcut
Next Step
Now that you know the main interface, configure your first model. Once a model is available, Helix can start replying and executing tasks.